
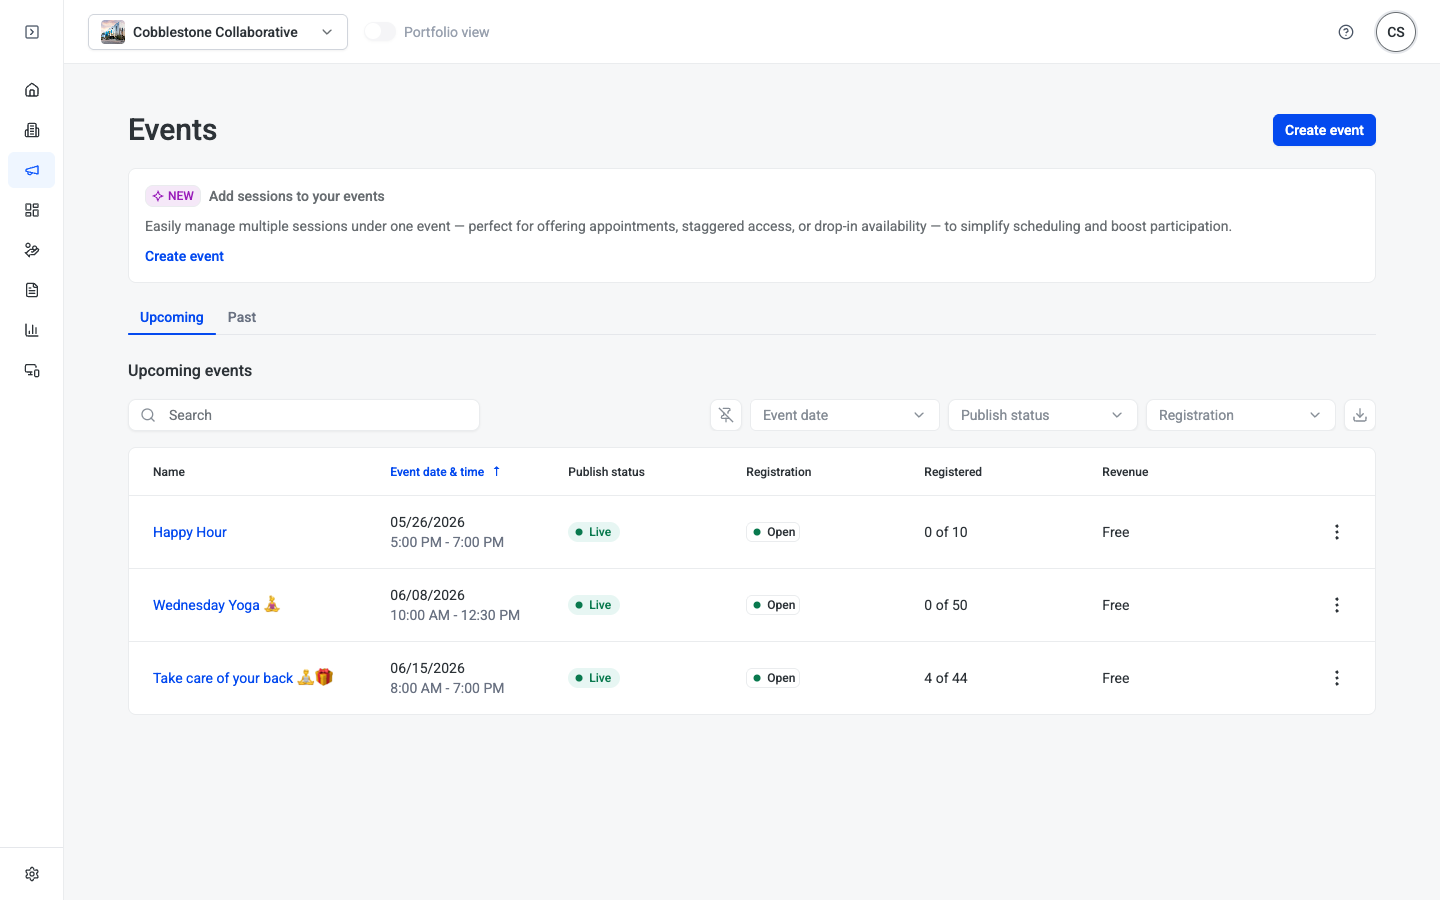
Events lets property teams plan, promote, and manage tenant events end-to-end: publish the event, collect RSVPs, manage attendees, check people in on the day, and review attendance reports—all from one place. Single-session and multi-session formats are both supported, with optional capacity limits, waitlists, pricing, and automated notifications.
Overview
Navigate to HqO Admin > Experience > Events to access the Events dashboard. The page shows two tabs:
- Upcoming — events that have not yet ended
- Past — events that have ended
Each tab lists events in a table with the following columns:
| Column | Description |
|---|---|
| Name | Event title; click to open the event |
| Event date & time | Date and start–end time range (sortable) |
| Status | Live, Draft, or Archived |
| Registration | Open or Closed |
| Registered | Registrations taken vs. total capacity (e.g., 6 of 44) |
| Revenue | Free or total paid revenue |
Use the toolbar above the table to filter and export:
- Search — filter by event name
- Event date — filter by date range
- Status — filter by event status
- Filters — open advanced filters
- Export — download the list as CSV
- Pin filters — keep active filters visible between sessions
Click the three-dot menu (⋮) on any row to take quick actions on that event.
Creating an event
Click Create event from the Events list to begin. The form has two steps: Details and Target.
Step 1: Event details
Fill in the key information for your event.
Event information
| Field | Required | Notes |
|---|---|---|
| Title | ✓ | Up to 55 characters. Shown in the app. |
| Subtitle | ✓ | Up to 255 characters. Shown below the title. |
| Image | ✓ | Upload a hero image for the event card and detail page. |
| Image alt text | ✓ | Up to 55 characters. Describe the image for accessibility. |
| Description | ✓ | Rich text field. Supports formatting, links, and lists. |
Date and availability
- Select the Date for your event.
- Choose the session format:
Single session — one fixed time block with a single start and end time. Use for workshops, parties, keynotes, and similar events.
Multiple sessions — several bookable time slots within the same event. Use for massage appointments, yoga classes, wellness days, and any event where attendees choose a specific slot.
Configuring a single session
| Field | Required | Notes |
|---|---|---|
| Start time | ✓ | |
| End time | ✓ | |
| Capacity | — | Leave blank for unlimited. |
| Price | — | USD amount. Requires Stripe. Leave blank for free. |
| Enable waitlist | — | Toggle on to let users join a waitlist when full. |
Configuring multiple sessions
| Field | Required | Notes |
|---|---|---|
| Sessions start at | ✓ | Time the first session begins. |
| Sessions end at | ✓ | Time the last session ends. |
| Session duration | ✓ | Length of each session in minutes. |
| Buffer time | — | Gap between sessions (e.g., 10 minutes for turnover). |
| Capacity per session | — | Maximum attendees per slot. Leave blank for unlimited. |
| Price per session | — | USD amount. Requires Stripe. Leave blank for free. |
| Enable waitlist | — | Toggle on to allow waitlisting when a session is full. |
| Limit sessions per person | — | Toggle on to cap how many slots one attendee can book. Attendees can still join waitlists for additional sessions. |
After entering these values, a Session preview shows how many sessions will be created. Review the list to confirm the generated slots match your schedule.
Blocking sessions
Once the session schedule is generated, you can exclude specific slots from booking without removing them from the visible schedule. Blocked sessions:
- Appear as unavailable in the session list — attendees see the slot but cannot book it
- Cannot be booked — direct registration and waitlist enrollment are both disabled for that slot
- Do not count toward the event's total available capacity
- Differ from sold-out sessions — a sold-out session has exhausted its capacity; a blocked session is intentionally excluded regardless of remaining capacity
To block a session, open the event's Details tab, locate the session in the Schedule preview, and toggle the session to Blocked. Click Save to apply. Blocked sessions remain visible to attendees with an unavailable indicator so the schedule gap is clear.
Registration and cancellation
- Registration deadline — Toggle on to set a cutoff (in minutes, hours, or days) before the event starts, after which new registrations are not accepted.
- Cancellation deadline — Toggle on to set a cutoff before which attendees must cancel or lose their spot.
Check-in
| Setting | Description |
|---|---|
| Enable check-in | Toggle on to activate QR-code check-in for this event. |
| Host check-in | Only admins can scan QR codes. Attendees cannot self-check-in. Recommended when you need full control over arrivals. |
| Host and attendee check-in | Attendees can check in via the app once check-in opens; admins can still scan QR codes. Recommended for larger or open-format events. |
| Advanced check-in period (minutes) | How far in advance attendees can check in. The system sends a check-in notification at this time. |
CTA button
Choose the label for the registration button shown to tenants in the app:
- Book
- RSVP
- Custom text — enter your own label
Additional modules (optional)
| Field | Description |
|---|---|
| Custom host name | Display a custom host or presenter name on the event. |
| Admin confirmation/forwarding email | Receive a copy of all registration confirmation emails. |
| Address | Physical location of the event. |
| Directions | Additional directions or access instructions. |
Step 2: Target
Control who sees the event and when it goes live.
Publish
- Publish now — the event goes live immediately and is visible to tenants in the app.
- Schedule for later — set a future date and time for the event to go live.
Audience
Select one or more building audiences from the Audience field. Each selected audience determines which tenants can see and register for the event.
The Publish to table shows each building covered by the selected audiences. For each building, choose the Content section where the event will appear on the homescreen (e.g., Events & Happenings).
Notifications
Click Connect a notification to this event to attach a push or in-app notification that promotes the event. All notifications also appear in the in-app notification center; push notifications deliver to users who have enabled them.
Finishing up
Click Create (top right) to save. The event is created with status Draft if you chose Schedule for later, or Live if you chose Publish now.
💡 Tip: You can edit any field after creation. Open the event and click Save to apply your changes.
Managing an event
Click any event name from the Events list to open it. The left sidebar shows three sections:
- Details — edit all event settings
- Target — edit publish schedule, audience, and notifications
- Reports — view live stats and manage attendees
The event header shows the current status (Live or Draft), a language picker for multi-language content, a Save button, and a three-dot menu (⋮) for additional actions.
Reports tab
The Reports tab is the central hub for monitoring and managing an event once it's published.
Status banner
When check-in is open, a banner displays at the top with a Scan to check-in button. Click it to open the QR scanner directly.
Summary cards
| Card | What it shows |
|---|---|
| Event | Event date and time, plus a countdown (e.g., "Starts in 1 month") |
| Registrations | Registrations taken vs. capacity, with a progress bar |
| Check-ins | Check-ins completed vs. total registrations, with a progress bar |
| Cancellations | Total cancellations and when the last one occurred |
Attendees table
The Attendees section lists everyone who has registered, is on the waitlist, or has cancelled.
Toolbar:
| Control | Description |
|---|---|
| Search | Filter attendees by name or email (see details below) |
| Pin filters | Persist active filters |
| Scan to check-in | Open the QR scanner |
| Filters | Filter by session, status, or other criteria |
| Export | Download the attendee list as CSV |
| Add Attendee | Manually register someone (see below) |
Searching attendees
Use the Search field to find attendees by name or email. The search supports:
- First name, last name, or full name — type any part of the name to find matches (e.g.,
JaneorSmith) - Either word order —
Jane SmithandSmith Janeboth return the same attendee - Email address or partial email — type a partial address (e.g.,
jane@oracme.com) to filter by domain or prefix - Mixed case — search is case-insensitive;
JANE,jane, andJaneall match
While a search is active, the attendee count displayed in the Attendees tab header updates to reflect the number of filtered results, not the total registration count.
To restore the full attendee list, clear the Search field.
Table columns:
| Column | Description |
|---|---|
| Name | Attendee's full name and email address |
| Tenant | The tenant company the attendee belongs to |
| Session | The specific session the attendee registered for (multi-session events) |
| Registered | Timestamp of when the registration was created |
| Last updated | Timestamp of the most recent status change (default sort column) |
| Status | Current registration status (see below) |
| (check-in column) | Check-in status indicator |
Registration statuses: Registered (confirmed; holds a spot), Waitlisted (notified if a spot opens), Cancelled (cancelled by attendee or admin).
Check-in statuses: Checked In (attendee checked in) and Unclaimed (registered but not yet checked in).
Adding an attendee manually
- Click Add Attendee in the Reports tab.
- Search for and select the user.
- For multi-session events, choose the session time slot.
- Select the initial status: Registered or Waitlisted.
- Choose whether to send them a confirmation notification.
- Click Add.
Updating an attendee's status
Click the action button next to an attendee's status to change it:
- Registered ↔ Waitlisted — promote from waitlist or move back
- Registered → Cancelled — cancel their registration
- Registered → Checked In — manually mark as checked in without scanning
Checking in attendees with QR codes
- Open the event in HqO Admin and go to the Reports tab.
- Click Scan to check-in (in the banner or the attendee toolbar).
- Allow camera access when prompted.
- Point the camera at the attendee's QR code (shown in the HqO app or their confirmation email).
- The attendee's status updates to Checked In instantly.
💡 Tips:
- Any device with a camera works: phone, tablet, laptop webcam, or external USB camera.
- Use an external USB camera for the fastest throughput at high-volume events.
- For multi-session events, open check-in 5–10 minutes before each session starts.
- Test scanning before the event to catch any lighting or connectivity issues.
Editing event details after publishing
Open the event, select the Details or Target tab, make your changes, and click Save. Changes to a live event take effect immediately.
⚠️ Note: The event Date and Session type (Single vs. Multiple) cannot be changed after the event is created.
Automated notifications
HqO automatically sends the following notifications. No configuration is required beyond setting up the event.
| Trigger | Recipient | What it contains |
|---|---|---|
| Registration confirmed (free) | Attendee | Event details, date, location, QR code |
| Registration confirmed (paid) | Attendee | Event details, payment receipt, QR code |
| Check-in reminder | Attendee | QR code, session time, location |
| Cancellation confirmed (free) | Attendee | Cancellation confirmation |
| Cancellation confirmed (paid) | Attendee | Cancellation confirmation and refund details |
| Waitlist joined | Attendee | Confirmation that they're on the waitlist; link to leave |
| Waitlist spot available | Waitlisted attendee | Invitation to register, with an expiration window |
FAQ
Can I run paid events? Yes. Set a price per session when creating the event. Paid events require a Stripe integration. Contact your HqO account team to enable Stripe for your property.
Can I create an event with multiple time slots? Yes. Choose Multiple sessions when creating your event. Each session gets its own capacity, waitlist, and check-in tracking.
What is the difference between a blocked session and a sold-out session? A sold-out session is full because all available spots have been taken. A blocked session is intentionally excluded by an admin regardless of how many spots remain — it cannot be booked and does not contribute to available capacity. Both types still appear in the session list so attendees can see the full schedule.
Can I add an attendee after the event starts? Yes. Use Add Attendee from the Reports tab at any time, including during or after the event.
What happens when a waitlist spot expires? If the invited user does not register within the expiration window, their invitation expires and the next person on the waitlist receives an invite. The expiration window is set during event creation.
Can I export the attendee list? Yes. Click Export in the Reports tab to download a CSV of all attendees and their statuses.
Can I publish an event in multiple languages? Yes. Use the Lang picker in the event header to switch between supported languages (English (US), English (GB), French, Spanish, German, Dutch, Italian, Norwegian, Polish, and more) and enter translated content for each.
How do I close registration before the event? Go to Details, enable Registration deadline, and set the cutoff window. Alternatively, change the registration status directly from the event's Target tab.
Can I duplicate an event? Not currently. Create a new event and re-enter the details, or contact your HqO account team for assistance.
Need help?
Contact your HqO account team or email appsupport@hqo.co.
Related
- Content — Promote events through homescreen content tiles
- Communications — Send event announcements via push notification or email
- Audiences — Manage the audience groups used to target events