
Receive, track, and resolve maintenance and service requests submitted by tenants — with team assignment, approval workflows, and two-way messaging built in.
Overview
Service Requests is the property team's primary interface for handling tenant-submitted issues. Tenants report problems through the HqO mobile or web app — temperature, lighting, cleaning, repairs, access issues, and more — and those requests appear here immediately.
Each request moves through a configurable status and approval workflow, can be assigned to a team or individual owner, and supports two-way messaging between staff and the tenant who submitted it.
Navigate to HqO Admin > Operations > Service Requests to get started. The URL is gohqo.co/admin-work-orders.
💡 Tip: Use the Company filter to quickly view all open requests from a specific tenant organization.
Request list
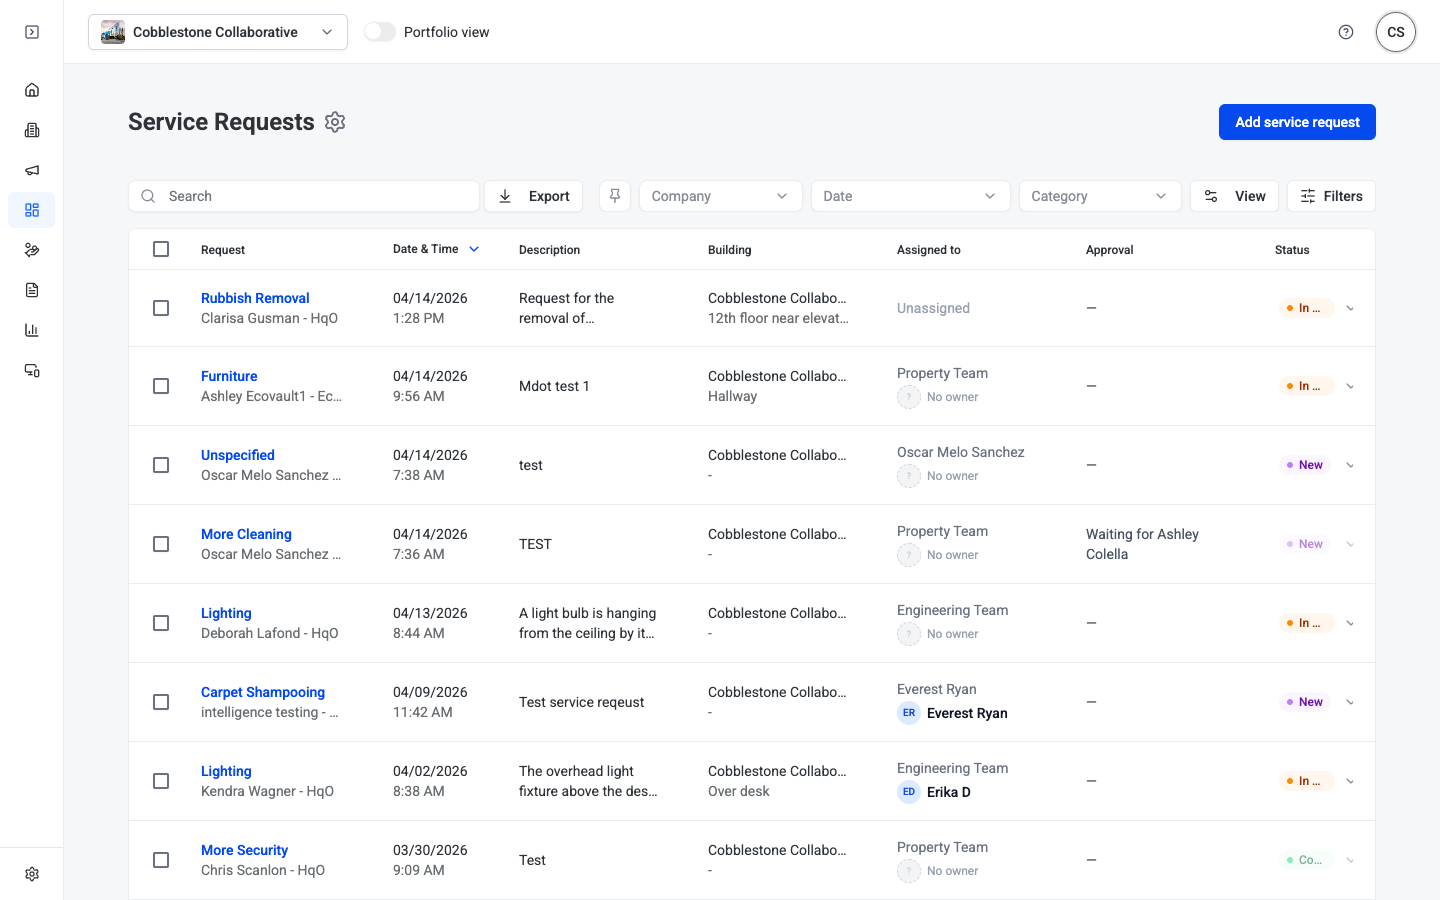
The main table shows all incoming requests with the following columns:
| Column | Description |
|---|---|
| Request | Service type name and the submitting tenant (name + company) |
| Date & Time | When the request was submitted |
| Description | Full text of the tenant's description |
| Building | Property and specific location within the building |
| Assigned to | The team or individual owner assigned to handle the request |
| Approval | Approval status if the service type requires approval before work begins |
| Status | Current resolution state of the request |
You can update the Status for each request directly from the table without opening the detail view, using the inline dropdown in the Status column.
Filters and search
| Filter | Options |
|---|---|
| Search | Full-text search across request title and description |
| Company | Filter by tenant company |
| Date | Filter by submission date range |
| Category | Filter by service category (e.g., Cleaning & Waste, Repairs & Maintenance) |
| Issue Type | Filter by specific service type within a category |
| Status | Filter by resolution status |
| Assigned to | Filter by assigned team or owner |
Use View to toggle column visibility, and Export to download the current filtered list as a CSV.
Request detail
Click any request to open the full detail view. This is where you manage the lifecycle of a specific request.
Request details panel
| Field | Description |
|---|---|
| Service Type | Category and specific type (e.g., Temperature & Air > Too Cold) |
| Requested by | Tenant name and email |
| Company | Tenant's organization |
| HqO Request ID | Unique alphanumeric ID (format: SR-XXXXXXXX) |
| Requested Date | Submission timestamp |
| Location | Building and specific floor, room, or area |
| Description | Full text of the tenant's issue |
Billing panel
Displays whether the service type is Free or has an associated charge. Paid service types require Stripe integration — contact your HqO account team to enable.
Approval panel
Appears when the service type is configured to require approval before work can begin. While a request is pending approval, the Status field is locked and cannot be changed.
| Approval state | Description |
|---|---|
| Pending | Awaiting approval from the designated approver |
| Approved | Approved — status can now be updated |
| Denied | Request denied — tenant is notified |
| Waiting for [role] | Indicates which role must act (e.g., Waiting for Property Team) |
💡 Tip: Approval requirements are configured per service type in Settings > Service types. If a service type doesn't require approval, the Approval panel does not appear.
Assignees panel
Assign the request to a team or to a specific owner within a team.
- Search by name, email, team name, or category.
- Select the team. All team members appear as individual Assign Owner options.
- Click Assign Owner next to the person responsible.
A request can have one team assigned with one designated owner. The assigned team receives an email notification when a new request is submitted (if notifications are enabled in Settings).
Messages panel
Two-way messaging with the tenant. Messages sent here are visible to the tenant in the HqO app. Attach files using the Attach file button.
Internal Notes panel
Staff-only notes. Not visible to the tenant. Use for internal coordination, updates, or context.
Case Files panel
Files attached when the case was created (via tenant attachment) or added through the Messages section. All file attachments are accessible here.
Location Details panel
Shows the building and specific location string the tenant entered when submitting the request.
Core workflows
Assign a request
- Open the request.
- In the Assignees panel, search for a team or person.
- Select the team, then click Assign Owner next to the individual.
Update request status
From the list view:
- Find the request in the table.
- Click the Status dropdown in the row.
- Select the new status.
From the detail view:
- Open the request.
- Click the status pill at the top right.
- Select the new status from the dropdown.
⚠️ Note: Status cannot be changed while a request is pending approval. Approve or deny the request first.
Approve or deny a request
- Open the request.
- In the Approval panel, click Approve or Deny.
- Once approved, the status field becomes editable and the assignee can proceed.
Add or reply to a message
- Open the request.
- In the Messages panel, type your message in the Add a message field.
- Attach a file if needed.
- Click Send. The tenant receives a notification.
Create a request manually
- From the Service Requests list, click Add service request.
- Select the service type (category > type).
- Search for and select the tenant.
- Fill in building, location, and description.
- Click Save.
Export requests
- Apply any filters you want to include.
- Click Export.
- Download the CSV file.
Resolution statuses
| Status | Color | Description |
|---|---|---|
| New | Purple | Submitted and awaiting review |
| In Progress | Orange | Assigned and being worked on |
| Completed | Green | Resolved and closed — cannot be modified |
| Cancelled | Gray | Withdrawn or invalid |
| Pending | Yellow | Custom status; configurable in Settings |
Completed and other terminal-state requests cannot be modified. Custom statuses can be added in Settings > Statuses.
Settings
Access settings via the ⚙️ gear icon next to the Service Requests page heading. Settings are organized across seven tabs.
💡 Tip: Setting up a building for the first time? The Configure Service Requests setup wizard walks through everything in one flow — building selection (or copying settings from an existing building), service types, teams, routing, statuses, and approval rules.
Settings tab
Request form settings — Configure which fields appear on tenant submission forms: Location (text input, enabled/not required), Description (textarea, enabled/required), Attachments (file upload, enabled/not required).
Access control: Allow tenant admins to manage service requests — When enabled, tenant admins can create, review, and update requests for their buildings.
Notification preferences: Notify requestor (confirmation and status updates to the tenant), Notify assigned team (email on new requests), Notify on status changes (email on status updates or comments; customizable per service type and status).
Display settings: Identifier — the prefix used in request IDs (default: SR, producing IDs like SR-123456). Admin alert — optional banner with a custom message shown to admins.
Request forms tab
Create custom form templates that control which fields appear for tenants when they submit a request. The default form applies to any service types not assigned to a custom template. Click + Create template to build one; assign templates per service type in Settings > Service types.
Statuses tab
Manage the set of resolution statuses. Built-in statuses (New, Completed, Cancelled, In Progress) can be edited but not deleted. Custom statuses can be added and deleted. Each status shows a Type Count (number of service types that use it).
Service types tab
Organize request types into categories and configure approval workflows, team assignments, and custom statuses per type.
Categories group related request types and display as a browseable menu to tenants. Default categories:
| Category | Description | Default team |
|---|---|---|
| Cleaning & Waste | Trash, recycling, carpet, windows (10 types) | — |
| Temperature & Air | Too hot, too cold, air quality (5 types) | Engineering Team |
| Repairs & Maintenance | Broken fixtures, leaks, structural (13 types) | Engineering Team |
| Access & Security | Keys, badges, locks, spaces (9 types) | — |
| Hospitality & Concierge | Deliveries, event setup, general help (6 types) | Property Team |
| Signage & Facilities | Directories, parking, signage (3 types) | — |
| Other Requests | Catch-all for unlisted types (3 types) | Property Team |
Click + Add category or + Add service type to extend the list. Service types can be configured with a designated team, an approval requirement (which role must approve before work begins), and custom statuses.
Teams tab
Create and manage the staff teams that handle service requests. Each team has a name and description, an enabled/disabled toggle, a list of team members, and assigned service categories and types.
Default teams: Property Team (all property admins; handles Access & Security, Hospitality & Concierge, Signage & Facilities, Other Requests) and Engineering Team (Temperature & Air, Repairs & Maintenance). Click + Add team to create additional teams.
Connected accounts tab
Connect external platforms to sync service requests: Salesforce — syncs service requests with Salesforce cases. Click Connect to authorize. Additional integrations may be added over time.
Message suggestions tab
Create preset message templates for quick replies to tenants. Templates appear as suggestions when staff compose a message, and can be scoped to specific service types (Type Scope).
FAQ
Can I assign a request to more than one team or person? Each request has one assigned team and one designated owner within that team. If a request spans multiple teams, route it to the primary responsible team and coordinate internally.
Why can't I change the status on some requests? Requests pending approval are locked until approved or denied. Completed requests are in a terminal state and cannot be modified.
Can tenants see staff messages? Yes. Messages in the Messages panel are visible to the tenant in the HqO app. Use Internal Notes for staff-only communication.
How do approval workflows work? Approval is configured per service type in Settings > Service types. When required, a designated approver must approve the request before it can be actioned. The Approval panel shows the current state and blocks status changes until resolved.
Can I change the request ID prefix? Yes. Go to Settings > Settings tab and edit the Identifier field. The prefix applies to all new requests going forward.
How do I add custom request types? Go to Settings > Service types and click + Add service type. Assign it to an existing category or create a new category with + Add category.
Need help?
Contact your HqO account team or email appsupport@hqo.co.
Related
- Visitor Management — Front desk and guest management
- Users — Manage building staff and their admin roles