
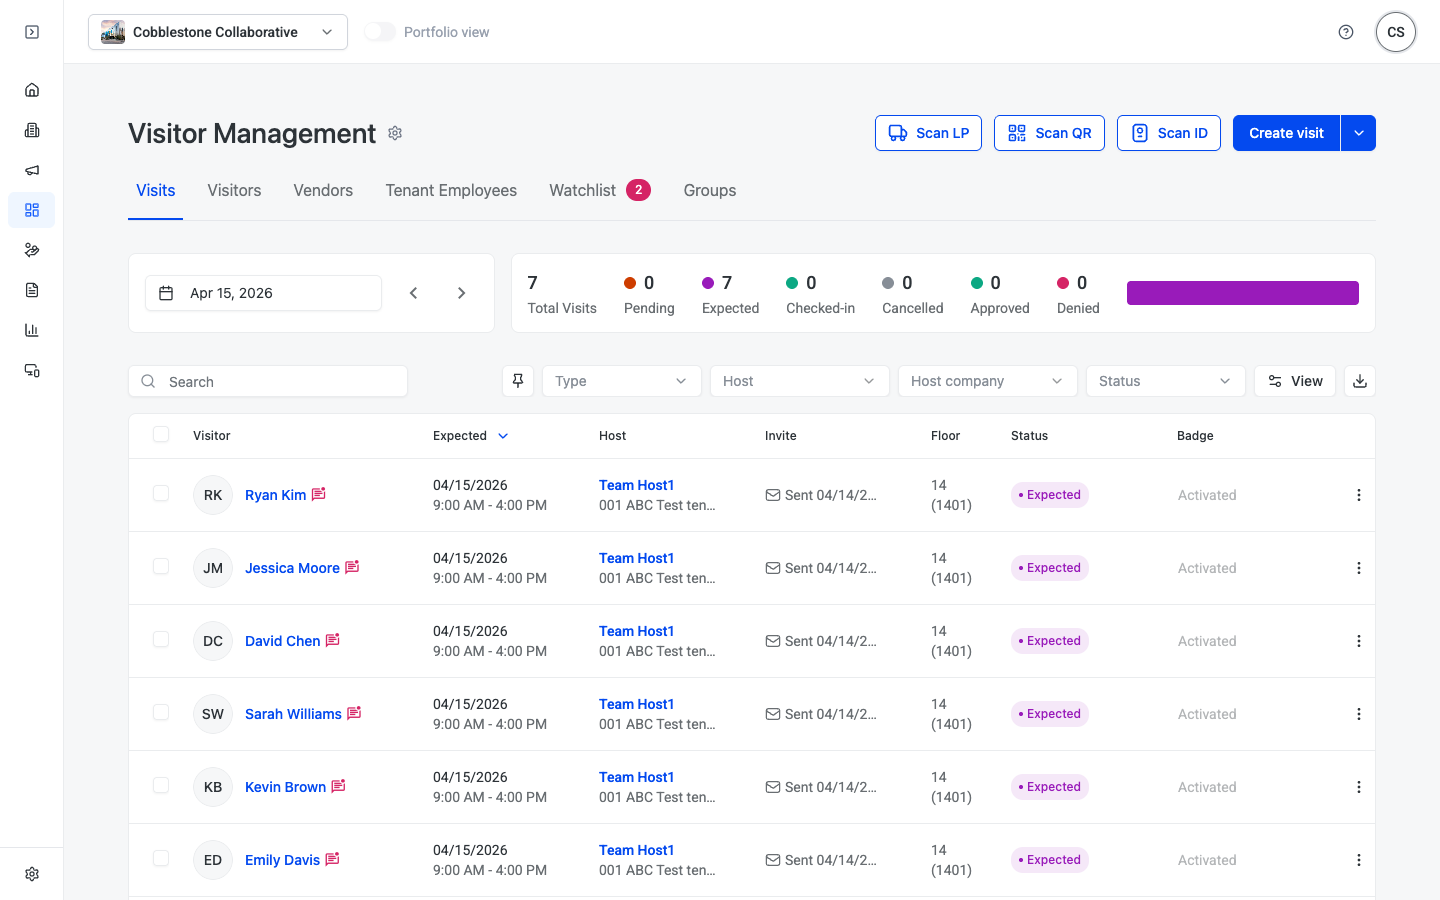
Manage every aspect of your building's front desk from one screen: pre-register guests, scan visitors in, track vendor certificates of insurance, and review security watchlist matches.
Overview
Navigate to HqO Admin > Operations > Visitor Management to access the full visitor workflow. The page is organized into six tabs — Visits, Visitors, Vendors, Tenant Employees, Watchlist, and Groups — covering everything from daily check-ins to recurring vendor management.
At the top of the page, four global actions are always available:
| Action | Description |
|---|---|
| Scan LP | Scan a vehicle license plate to match or create a visit |
| Scan QR | Scan a visitor's QR code invite to check them in |
| Scan ID | Scan a government-issued photo ID to match a visit |
| Create visit | Manually create a new visit record (dropdown arrow reveals additional options) |
Click the ⚙ Settings gear icon next to the page title to configure notification emails and host alerts.
💡 Tip: Tenants can pre-register their own guests through the HqO mobile or web app. Those visits appear automatically in the Visits tab before the visitor arrives.
Tabs
Visits
The Visits tab is the primary daily view for front desk staff. It defaults to the current date and shows all visit records with real-time status updates.
Date navigation — Use the date picker and the ‹ and › arrows to browse visits by day.
Daily stats bar — A color-coded summary displays the count for each status at a glance:
| Status | Indicator color | Meaning |
|---|---|---|
| Total Visits | — | All visits for the selected date |
| Pending | 🟠 Orange | Visit created but not yet confirmed |
| Expected | 🟣 Purple | Visitor is registered and expected to arrive |
| Checked-in | 🟢 Green | Visitor has been checked in |
| Cancelled | ⚫ Grey | Visit was cancelled |
| Approved | 🟢 Green | Visit approved (used with watchlist or approval workflows) |
| Denied | 🔴 Red | Visit denied |
Filters — Narrow the visit list using the filter bar:
| Filter | Description |
|---|---|
| Search | Search by visitor or host name |
| Type | Filter by visit type |
| Host | Filter by the tenant employee hosting the visit |
| Host company | Filter by tenant organization |
| Status | Filter by visit status |
| 📌 Pin | Pin current filter selection so it persists across sessions |
| View | Toggle column visibility |
| Filters | Access additional filtering options |
| ↓ Download | Export the current view to CSV |
Visit table columns:
| Column | Description |
|---|---|
| Visitor | Visitor name and company |
| Expected | Scheduled visit date and arrival window |
| Host | Tenant employee hosting the visit and their company |
| Invite | Whether an invite was sent and the timestamp |
| Floor | Destination floor in the building |
| Status | Current visit status (color-coded badge) |
| Badge | Badge assignment state (e.g., Activated) |
| ⋯ Actions | Per-row menu for check-in, cancellation, editing, and more |
Visitors
The Visitors tab shows a searchable directory of all previous visitors across all dates — not just today.
Table columns: Visitor (name and company), Email, Phone, Host company.
Filters: Search, Host company, Host
Row action: Click Add another visit to quickly schedule a follow-up visit for a returning guest without re-entering their details.
Vendors
The Vendors tab manages recurring service vendors and tracks their Certificate of Insurance (COI) status.
Table columns: Vendor (name, logo, website), Industry, COI (on file + expiry date), COI status, Vendor personnel (primary contact).
COI status values:
| Status | Meaning |
|---|---|
| Active 🟢 | COI on file and currently valid |
| Not yet active ⚪ | COI submitted but not yet in effect |
| No COI | No certificate of insurance on file |
Filters: Search, COI status
Row action: Click Check in to log the vendor's arrival without creating a formal visit record.
Tenant Employees
The Tenant Employees tab lists all tenant staff who may visit the building and shows their pass status.
Table columns: Name, Email, Company, Status.
Status values:
| Status | Description |
|---|---|
| Requires approval | A staff member must manually approve before this employee receives a building pass |
| No approval required | Employee can receive a pass without manual review |
Filters: Search, Status, Company
Row actions: Click Request pass to initiate approval, or Activate pass when no approval is required.
Watchlist
The Watchlist tab flags visitors who match a security watchlist entry. Matched visits are held in Pending status and cannot be checked in until a security admin reviews and approves or denies them.
A badge on the Watchlist tab counts unresolved matches (e.g., Watchlist 2).
Table columns: Visitor (name and email), Created, Expected, Host, Match (watchlist entry + reason), Status.
Filters: Search, Host, Status
Row actions: Click Approve to clear the match and allow check-in, or Deny to prevent check-in. Click Manage watchlist in the top right to add, edit, or remove watchlist entries.
How the watchlist works
When a tenant registers a visitor, HqO automatically scans the submitted information against the active watchlist. A match triggers the following:
- The visit status is set to Pending — check-in is blocked until cleared.
- The tenant host receives a Visit Pending email notification.
- The security admin receives a Watchlist Match email and a badge appears on the Watchlist tab.
- The security admin reviews the match and clicks Approve or Deny.
- The tenant host is notified of the decision by email.
Match criteria — A visit is flagged if the visitor's information matches any of:
- Last name + first two letters of first name
- Email address
- Phone number
Adding entries to the watchlist
⚠️ Note: The Watchlist feature must be enabled first. Go to Settings > Features and turn on the Enable Watchlist toggle.
- Go to the Watchlist tab.
- Click Manage watchlist.
- Click Add to open the form.
- Fill in the person's details: first name and last name are required; aliases, email, phone, reason, and photo (PNG or JPEG) are optional.
- Click Add. The entry is active immediately.
Groups
The Groups tab manages group visit records, where multiple visitors arrive together under a single record.
Table columns: Group name, Members (count), Created by.
Row action: Click Invite group to send a visit invitation to all members of the group. Click Create new group in the top right to create a new group record.
Core workflows
Check in a visitor manually
- Go to HqO Admin > Operations > Visitor Management.
- On the Visits tab, confirm the correct date is selected.
- Find the visitor's row in the table.
- Click the ⋯ Actions menu on the right side of the row.
- Select Check in.
Scan a visitor in
- Click Scan QR, Scan LP, or Scan ID at the top of the page.
- Use the camera to scan the visitor's QR invite, license plate, or photo ID.
- The system matches the scan to an existing visit or prompts you to create a new one.
Create a bulk visit
Bulk Visitor Registration lets you register multiple visitors — each with their own host, arrival time, and date — in a single session. Ideal for conferences, large events, or staggered visitor schedules.
- Go to HqO Admin > Operations > Visitor Management.
- Click the dropdown arrow next to Create visit.
- Select Bulk visit.
- In the bulk visitor modal, either enter visitor details one by one using the form, upload a CSV file using the visitor template, or use the Invite group dropdown to select a saved group.
- For each visitor, fill in: email, first name, last name, phone (international format), start/end date, start/end time, host email, check-in type (Check-in at desk or Stop at desk), floor/suite, max entries (1, 2, or Unlimited), notifications (email, SMS, or both), visitor note (shown to visitor), and front desk note (internal only).
- Optionally check Save as group to save this visitor list for future use (e.g., "Marketing Team").
- Click Create visits. A progress bar confirms creation, and visits appear immediately in the Visits table.
💡 Tip: CSV uploads have a 5 MB max size. If any rows have errors, the interface highlights them and explains the issue — fix and re-upload.
Create a visit manually
- Click Create visit.
- Enter the visitor's name, company, host, floor, and expected arrival time.
- Save. The visit appears in the Visits tab for the selected date.
💡 Tip: New visits default to business hours on the current day, with a start time at the nearest 15-minute interval in the past. Adjust the date and time as needed before saving.
Cancel or check out a visit
- Cancel a visit when you know the visitor will not arrive. Change the visit Status to Cancelled — building staff are notified, and if an access control system is connected, the visitor's temporary access is removed.
- Check out a visitor when they leave the building. Change the visit Status to Checked-out — if an access control system is connected, the visitor's temporary access is removed.
With an access control integration, visitor records are also removed from the access control system after the visit is complete.
Resolve a watchlist match
- Go to the Watchlist tab.
- Review the visitor and matching watchlist entry.
- Click Approve to allow check-in, or Deny to block entry.
Add a vendor
- Go to the Vendors tab.
- Click Add vendor (or use your building admin to import vendor records).
- Enter the vendor's name, industry, and COI details.
- Save. The vendor appears in the vendors list.
Invite a group visit
- Go to the Groups tab.
- Click Create new group and add all group members.
- Save the group.
- Click Invite group to send the visit invite to all members at once.
Settings
Access settings by clicking the ⚙ icon next to the Visitor Management page title, or navigate to HqO Admin > Operations > Visitor Management > Settings.
Feature settings
| Setting | Description |
|---|---|
| Administrator Email | Configure which email addresses receive visitor notification emails. Options: None (no notifications) or Custom email(s) (specify one or more addresses). |
| Host Email | Configure whether the tenant employee hosting a visit receives an email notification. Options: Yes or No. |
FAQ
Can tenants pre-register their own visitors? Yes. Tenant users with access to the HqO mobile or web app can pre-register visitors. Those visits appear in the Visits tab before the guest arrives.
What happens when a visitor matches the watchlist? The visit is flagged and cannot be checked in until a staff member reviews the match and clicks Approve or Deny in the Watchlist tab.
Can a visit span multiple days? Yes. When creating a visit, select a future date to add up to 25 additional dates to the same visit. See Multi-Day Visits for details.
Can I see visits from previous dates? Yes. Use the date picker at the top of the Visits tab to navigate to any past or future date.
What does the Badge column show? The Badge column indicates whether a building access badge has been assigned to the visitor and its current state (e.g., Activated).
How do I filter the visit list to a specific tenant? Use the Host company dropdown in the filter bar to narrow visits by tenant organization.
What's the difference between Vendors and Visitors? Vendors are recurring service companies tracked with COI records and personnel contacts. Visitors are individuals (guests, clients) registered for specific one-time or recurring visits.
How do I track tenant employees specifically? Use the Tenant Employees tab, which lists all employees registered across your tenant companies and their building pass status.
Need help?
Contact your HqO account team or email appsupport@hqo.co.